TypeScript SDK
The cloud notification service enables server-side applications to send interactive notifications with support for hierarchical organizational structures, flexible targeting options, and cross-platform delivery. The service communicates with your server-side applications via the TypeScript SDK or the Java SDK.
For an overview, see HERE cloud notification service overview
Installation
- Install the latest version of Node.js on your server: https://nodejs.org/en/download
If you need to maintain multiple versions of Node, you can use nvm to install Node.
- Use npm (comes with Node) or yarn to install the
@openfin/cloud-notification-core-apipackage.
npm install @openfin/cloud-notification-core-api
yarn add @openfin/cloud-notification-core-api
Basic setup
To get started, import the CloudNotificationAPI class and configure your connection settings.
The basic setup requires a platform ID and authentication method.
// Import the main CloudNotificationAPI class
import { CloudNotificationAPI } from "@openfin/cloud-notification-core-api";

// Configure connection settings
const connectSettings = {
  platformId: PLATFORM_ID, // Unique identifier for your platform
  authenticationType: "basic", // Authentication method (basic, oauth, default)

  logger: (level, message) => {
    // Optional: Custom logging function
    console.log(`\nAPI Log [${level}] ${message}\n`);
  },
};

// Create a new notification API instance
const notificationApi = new CloudNotificationAPI({
  url: "https://<env>/notifications", // Your notification server endpoint
});
Establish a connection
Once you've configured your settings, establish a connection to the notification service. This creates an authenticated connection that's used for all subsequent operations.
let connectionResult;
try {
  // Attempt to establish connection to the notification service
  connectionResult = await notificationApi.connect(connectSettings);
  console.log("Connected successfully");
} catch (error) {
  // Handle connection failures gracefully
  console.error("Connection failed: ", error);
  process.exit(1); // Exit if we can't connect
}
Event listeners
Set up event listeners to handle connection state changes and incoming notifications. These listeners ensure your application responds appropriately to network issues, connection expiration, and new messages.
// Handle automatic reconnection after network issues
notificationApi.addEventListener("reconnected", () => {
  console.log("Connection Reconnected");
});

// Handle unexpected disconnections
notificationApi.addEventListener("disconnected", () => {
  console.log("Connection Disconnected");
  process.exit(1); // Exit application on disconnect
});

// Handle incoming notifications from other clients
notificationApi.addEventListener("notification", (event) => {
  console.log("Notification Received");
  // Unique notification identifier
  console.log(`ID: ${event.notificationId}`);
  // Your custom correlation ID
  console.log(`Correlation ID: ${event.correlationId}`);
  // Who the notification was sent to
  console.log(`Target: ${event.target}`);
  // Type of action (create, update, etc.)
  console.log(`Action: ${event.action}`);
  // The actual notification content
  console.log(`Payload:`, event.payload);
});
Publish a notification
Once connected, you can send notifications to users and groups. Notifications can be simple text messages or complex content with markdown formatting, images, and interactive elements. See Notification Center.
Notification payloads in the cloud service are structured in the same way as notification objects in Notification Center.
Basic notification
Here's how to send a simple notification with text content and basic targeting.
correlationId is an optional, user-defined ID that correlates a notification with the users' custom data.
const result = await notificationApi.raiseNotification(
  // Targeting configuration
  {
    // Your custom ID for tracking this notification
    correlationId: CORRELATION_ID,
    targets: {
      // Send to users in the "london" group
      groups: [GROUP_NAME],
      // Also send to specific users
      users: [USER_EMAIL],
    },
  },
  // Notification content and styling
  {
    // Support for markdown formatting
    template: "markdown",
    // Visual indicator (info, warning, error, etc.)
    indicator: { type: "info" },
    // Notification title
    title: "Important Update",
    // Main content
    body: "This is a notification with **markdown** support!",
    // Category for organization/filtering
    category: "Updates",
    // Path to notification icon
    icon: "ui/icon.png",
    // Your custom data for the application
    customData: { context: "example" },
    // Action to perform when user clicks
    onSelect: { task: "ViewDetails" },
    // Timestamp for the notification
    date: new Date(),
    // Display behavior (sticky, temporary, etc.)
    toast: "sticky",
  }
);

// Returns notification ID and status
console.log("Notification sent:", result);
Group targeting and hierarchies
Target notifications using hierarchical group structures for efficient and flexible notification distribution.
For example, given this group structure:
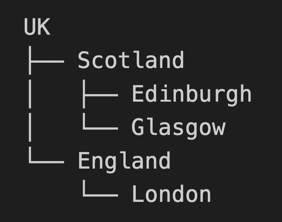
- Targeting London sends to direct London group members only
- Targeting Scotland sends to Scotland, Edinburgh, and Glasgow members
- Targeting UK sends to all members in the hierarchy
In the case of duplication, all members receive only one notification.
// Target specific group only - no inheritance
const londonOnly = {
  targets: {
    // Only direct members of London group receive the notification
    groups: ["London"],
    users: [],
  },
};

// Target group and all subgroups - inheritance applies
const scotlandAll = {
  targets: {
    // Scotland, Edinburgh, and Glasgow members all receive it
    groups: ["Scotland"],
    users: [],
  },
};

// Target entire hierarchy - maximum reach
const ukAll = {
  targets: {
    // All UK members and subgroups receive the notification
    groups: ["UK"],
    users: [],
  },
};

// Mixed targeting - combine groups and individual users
const mixed = {
  targets: {
    // Multiple groups
    groups: ["London", "Edinburgh"],
    // Plus specific individuals
    users: [USER_EMAIL],
  },
};
Bulk operations
The TypeScript SDK supports three bulk operations for managing multiple notifications at once.
-
deleteNotificationdeletes one or more notifications -
setReminderschedules a reminder for one or more notifications -
cancelRemindercancels one or more previously scheduled reminders
The Query API is currently only available in the Java SDK. The TypeScript SDK supports bulk update operations, but you will need to obtain notification IDs through other means (such as tracking them when notifications are raised).
deleteNotification
Marks one or more notifications as deleted in the Cloud Notification service. This causes notification events to be raised for each notification.
import { CloudNotificationAPI } from "@openfin/cloud-notification-core-api";

const api = new CloudNotificationAPI({
  url: process.env.NOTIFICATION_SERVER_HOST,
});

// Connect to the service
await api.connect(connectSettings);

// Delete a single notification
await api.deleteNotification("notification-id-1");

// Delete multiple notifications at once
await api.deleteNotification([
  "notification-id-1",
  "notification-id-2",
  "notification-id-3",
]);
setReminder
Posts a notification-reminder-created event for one or more notifications.
const notificationIds = ["notification-id-1", "notification-id-2"];

const reminderPayload = {
  reminderDate: new Date("2025-01-15T09:00:00Z"),
};

const targets = {
  users: ["user@example.com"],
  groups: ["trading-desk"],
};

// Set reminder for multiple notifications
await api.setReminder(notificationIds, reminderPayload, targets);
cancelReminder
Posts a notification-reminder-removed event for one or more notifications.
const notificationIds = ["notification-id-1", "notification-id-2"];

const targets = {
  users: ["user@example.com"],
  groups: ["trading-desk"],
};

// Cancel reminders for multiple notifications
await api.cancelReminder(notificationIds, targets);